Homemaster-MicroPLC

Product description
The HOMAMASTER MicroPLC is a compact and powerful open-source automation controller based on the ESP32-WROOM-32U. Designed for seamless integration with Home Assistant using ESPHome, it enables control of smart home devices, sensors, actuators, and industrial systems through RS-485 Modbus and wireless communication.
Maker: https://www.home-master.eu/
Product page: https://www.home-master.eu/shop/esp32-microplc-56 Schematics: https://github.com/isystemsautomation/HOMEMASTER/tree/main/MicroPLC/Schematic
Features
- ESP32-WROOM-32U microcontroller with Wi-Fi and Bluetooth
- ESPHome compatible firmware for seamless Home Assistant integration
- RS-485 Modbus RTU interface for extension module communication
- USB Type-C port for programming, debugging, and power
- 1-Wire interface with ESD and overvoltage protection
- PCF8563 RTC for accurate time-based automation
- One industrial-grade relay with varistor and opto-isolation
- One 24V digital input with surge protection (ISO1212)
- Four front-panel buttons and status LEDs for local control and diagnostics
- DIN-rail mountable for standard electrical enclosures
Networking
Wi-Fi Connectivity – Integrated Wi-Fi for wireless access and Home Assistant integration.
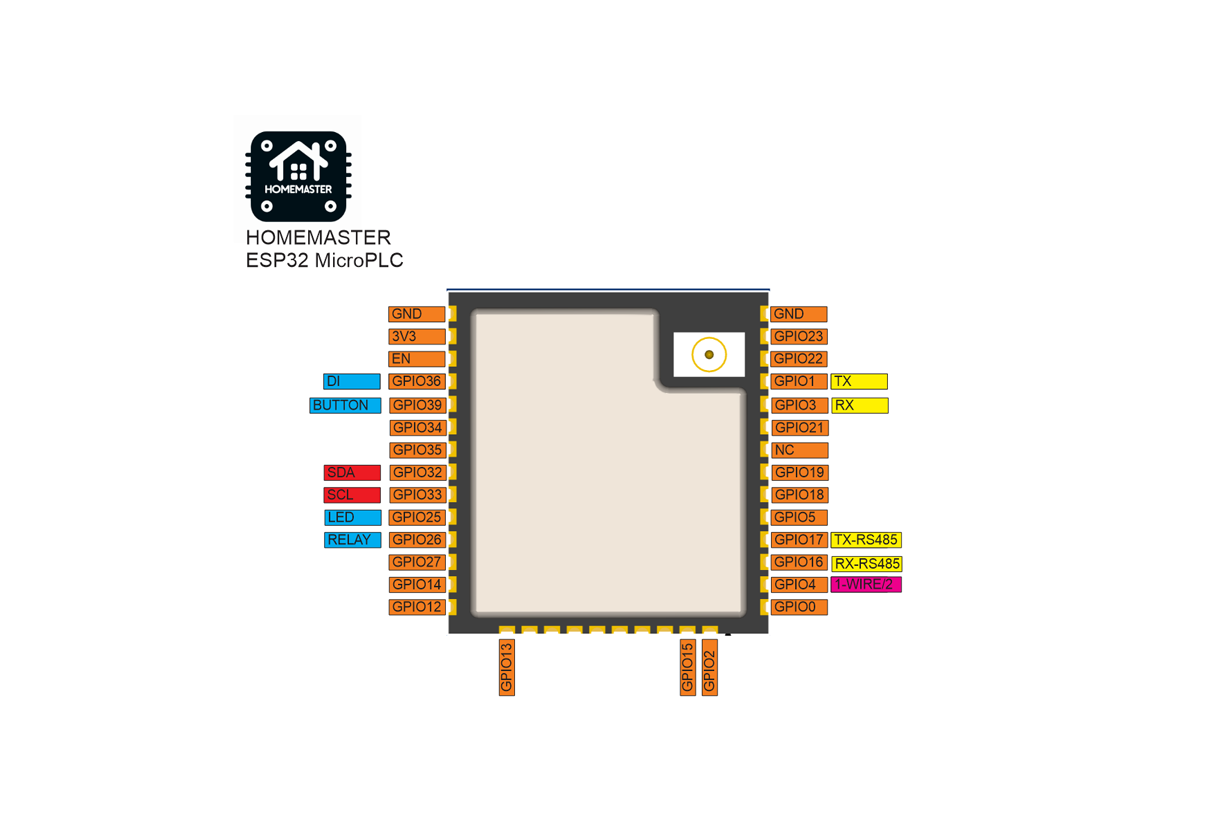
Pinout

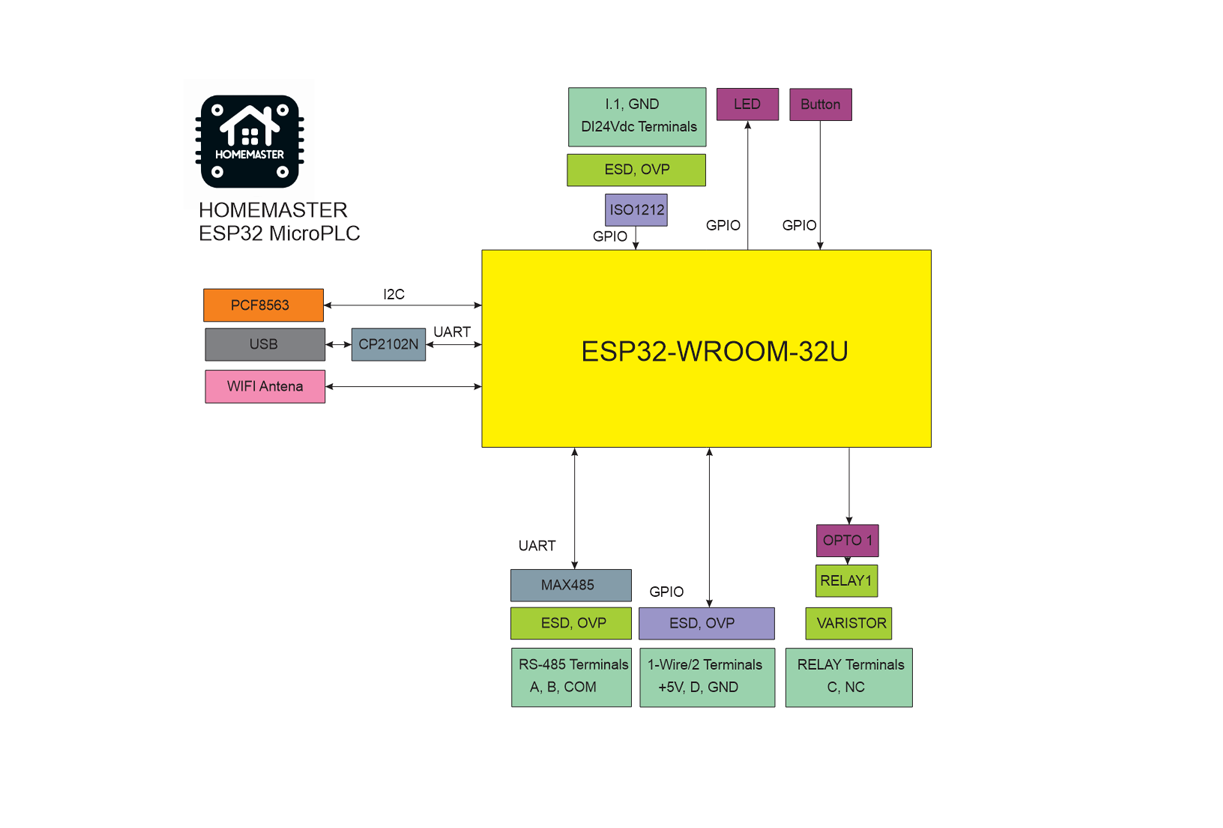
MicroPLC Functional Block Diagram

Programming
The MicroPLC comes with ESPHome pre-installed and can be configured via:
Improv
Wi-Fi Configuration with Improv
- Power on your HomeMaster MicroPLC.
- Go to 👉 improv-wifi.com (works in Chrome/Edge on desktop or mobile).
- Connect via USB (Serial) or Bluetooth LE.
- Enter your Wi-Fi SSID and password, then press Connect.
- The device joins your Wi-Fi and is now ready.
You can then access it via its local address (e.g., http://homemaster-microplc.local) or directly in Home Assistant.
One-Click Import (ESPHome Dashboard Import)
Once connected to Wi-Fi, the MicroPLC will be automatically discovered in ESPHome Dashboard.
When the device appears in ESPHome Dashboard, click “Take Control”.
The MicroPLC supports dashboard import, automatically pulling its official configuration from GitHub
USB Type-C: Use the ESPHome Dashboard to upload the configuration
- Connect the MicroPLC to your computer with a USB Type-C cable.
- Download the YAML configuration file from our GitHub
repository.(https://github.com/isystemsautomation/HOMEMASTER/blob/main/MicroPLC/Firmware/microplc.yaml) 3. Open the ESPHome Dashboard, import the YAML file, and update it with your Wi-Fi SSID and password. 4. Flash the device directly from ESPHome Dashboard. 5. The MicroPLC supports automatic reset and boot control — there is no need to press reset or boot buttons during programming. 6. After flashing, the device will reboot automatically and run the updated firmware.
Bus system configuration
I2C
| PIN | |
|---|---|
| SDA | GPIO32 |
| SCL | GPIO33 |
I2C addresses
| address | |
|---|---|
| pcf8563 | 0x51 |
Specifications
| Feature | Details |
|---|---|
| Microcontroller | ESP32-WROOM-32U |
| Power Supply | 5V via USB-C for programming or 24V via terminal |
| Relay Output | 1x 16A (optically isolated) |
| Digital Input | 1x 24V DI (ISO1212-based) |
| Communication | RS-485, Wi-Fi, Bluetooth, USB-C |
| RTC | PCF8563 |
| 1-Wire | 1 channel (ESD/OVP protected) |
| Mounting | DIN-rail |
| Firmware | ESPHome (pre-installed), Arduino |
Basic Config
substitutions:
  name: "homemaster-microplc" # Internal device name (used by ESPHome & hostname)
  friendly_name: "Homemaster MicroPLC" # Friendly name (shown in Home Assistant UI)
  room: "" # Optional: assign device to a room in HA
  device_description: "Homemaster MicroPLC" # Description for documentation
  project_name: "Homemaster.MicroPLC" # Project identifier
  project_version: "v1.0.0" # Firmware version
  update_interval: 60s # Default sensor update interval
  dns_domain: ".local" # mDNS domain suffix for network discovery
  timezone: "" # Timezone (can be set if device runs in different region)
  wifi_fast_connect: "false" # If true, reconnects faster (skips Wi-Fi scans)
  log_level: "DEBUG" # Logging level (NONE, ERROR, WARN, INFO, DEBUG, VERBOSE)
  ipv6_enable: "false" # Enable IPv6 if supported

esphome:
  name: "${name}" # Uses substitution for device name
  friendly_name: "${friendly_name}" # Uses substitution for friendly name
  comment: "${device_description}" # Metadata comment
  area: "${room}" # Assign device to a room
  name_add_mac_suffix: true # Appends MAC suffix to avoid duplicate hostnames
  min_version: 2025.7.0 # Minimum ESPHome version required
  project:
    name: "${project_name}" # Project name
    version: "${project_version}" # Project version

esp32:
  board: esp32dev # Target board type (generic ESP32 DevKit)
  framework:
    type: esp-idf # Use ESP-IDF (official Espressif framework)
    version: recommended # Recommended stable version

logger:
  baud_rate: 115200 # Serial logging baud rate
  level: ${log_level} # Logging level from substitutions

mdns:
  disabled: false # Enable mDNS for auto-discovery on the network

api: # Enable ESPHome API for Home Assistant integration

ota:
  - platform: esphome

network:
  enable_ipv6: ${ipv6_enable}

wifi:
  ap: {}
  fast_connect: "${wifi_fast_connect}"
  domain: "${dns_domain}"

captive_portal: # Captive portal for fallback hotspot

improv_serial: # Allows setup via Improv over Serial

esp32_improv:
  authorizer: none # No additional authorization required for Improv

dashboard_import:
  package_import_url: github://isystemsautomation/HOMEMASTER/MicroPLC/Firmware/microplc.yaml@main
  import_full_config: true
  # Allows importing this YAML from GitHub into ESPHome Dashboard

uart:
  tx_pin: 17 # UART TX pin
  rx_pin: 16 # UART RX pin
  baud_rate: 115200 # UART baud rate
  id: mod_uart # Identifier for UART bus

time:
  - platform: pcf8563 # Real-time clock (RTC) module via I2C
    id: pcf8563_time
    address: 0x51 # I2C address of PCF8563
  - platform: homeassistant
    id: ha_time
    # instead try to synchronize via network repeatedly ...
    on_time_sync:
      then:
        # ... and update the RTC when the synchronization was successful
        - pcf8563.write_time

i2c:
  - id: bus_a
    sda: 32 # I2C SDA pin
    scl: 33 # I2C SCL pin
    scan: true # Scan for devices at startup

one_wire:
  - platform: gpio
    pin: GPIO04 # Pin for 1-Wire devices (e.g., DS18B20 sensors)
    id: hub_1

switch:
  - platform: gpio
    name: "Relay" # Relay switch exposed to Home Assistant
    pin: 26
    id: relay1

status_led:
  pin:
    number: GPIO25 # Pin for status LED
    inverted: true # Inverted logic (LED ON when pin LOW)
    id: st_led