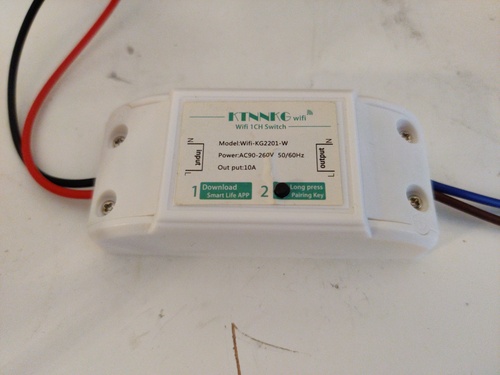
KTNNKG Wifi-KG2201-W
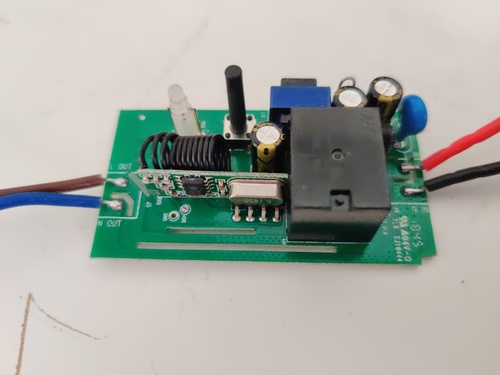
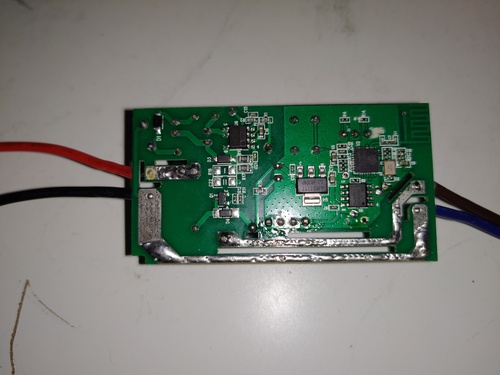
Single channel relay with 433Mhz RF module, flashable via tuya-convert or UART and GPIO0 (these, VCC, and GND are all conveniently broken out to pads). On this device, the relay is controlled by the ESP and RF signals are decoded by an RF module and sent to the ESP.
Because the actual handling of the RF signals is done by the ESP, any previous remote pairs will be reset upon flashing esphome. See the Remote Pairing section. However, each paired button can be sent to the smart hub such as Home Assistant, even if it doesn't control the relay in the device receiving the signal - allowing you to (indirectly) control any device/functionality in your smart home system through the RF buttons.
Pictures


GPIO Pinout
| Pin | Function |
|---|---|
| GPIO4 | Relay |
| GPI05 | RF code receiver |
| GPI012 | Button |
| GPIO13 | Red LED |
| GPIO15 | Blue LED |
Basic Configuration
substitutions:
  device_name: ktnnkg
  friendly_name: KTNNKG

esphome:
  name: ${device_name}

esp8266:
  board: esp01_1m

wifi:
  ssid: !secret wifi_ssid
  password: !secret wifi_password
  fast_connect: on #we only have one WiFi AP so just use the first one that matches
  ap: #since we listed an SSID above, this AP mode will only enable if no WiFi connection could be made
    ssid: ${friendly_name}_AP
    password: !secret wifi_password

logger:
  baud_rate: 0 #disable UART logging since we aren't connected to GPIO1
  level: DEBUG # esphome default is debug, but this must be at at least DEBUG for RC codes to be dumped to the log

# Enable Home Assistant API
api:

# Enable OTA updates
ota:
  safe_mode: True

# Enable web server
web_server:
  port: 80

switch:
  - platform: gpio
    name: "${friendly_name}"
    id: "relay"
    pin: GPIO04
  - platform: gpio
    name: "redLED"
    id: "redLED"
    internal: true
    pin: GPIO13
    inverted: true

status_led:
  pin:
    number: GPIO15
    inverted: true

remote_receiver:
  pin:
    number: GPIO05
    inverted: false
  dump:
    - rc_switch

binary_sensor:
  - platform: gpio
    pin:
      number: GPIO12
      inverted: True
    name: "${friendly_name} Button"
    on_press:
      - switch.toggle: "relay"
    internal: true
Remote Pairing
You will first need to flash the above firmware, and then view the serial output of the device (the 'show logs' button on the ESPHome dashboard works well for this, or just keep the terminal open after flashing via the dashboard). Press and hold for a bit the 433Mhz button you want to pair, and you should see something like this in the log (fake data shown here):
[13:07:27][D][remote.rc_switch:243]: Received RCSwitch Raw: protocol=1 data='101010101010101010101010'
[13:07:27][D][remote.rc_switch:243]: Received RCSwitch Raw: protocol=1 data='101010101010101010101010'
[13:07:27][D][remote.rc_switch:243]: Received RCSwitch Raw: protocol=1 data='101010101010101010101010'
[13:07:27][D][remote.rc_switch:243]: Received RCSwitch Raw: protocol=1 data='101010101010101010101010'
[13:07:27][D][remote.rc_switch:243]: Received RCSwitch Raw: protocol=1 data='101010101010101010101'
Save the 24-bit long 'data' code. Do not save any data that looks cut off, such as the last line shown above. Then, make a remote_receiver binary sensor in the binary sensors section of the configuration file (leaving the GPIO button). This example will toggle the relay when the RF button is pressed, and light up the red LED while the button is pressed:
binary_sensor:
  - platform: gpio
    pin:
      number: GPIO12
      inverted: True
    name: "${friendly_name} Button"
    on_press:
      - switch.toggle: "relay"
    internal: true
  - platform: remote_receiver
    internal: false
    name: "Button A1"
    rc_switch_raw:
      code: "101010101010101010101010"
    filters:
      delayed_off: 500ms
    on_press:
      then:
        - switch.turn_on: "redLED"
        - switch.toggle: "relay"
    on_release:
      then:
        - switch.turn_off: "redLED"
Momentary, interlocking or any other behavior (including only forwarding the button to HA) can be set with switch.turn_on/turn_off/toggle: "relay" in the on_press and on_release sections.
binary_sensor:
  - platform: gpio
    pin:
      number: GPIO12
      inverted: True
    name: "${friendly_name} Button"
    on_press:
      - switch.toggle: "relay"
    internal: true
  - platform: remote_receiver
    internal: true
    name: "Button A1" # button A1 set for momentary
    rc_switch_raw:
      code: "101010101010101010101010"
    filters:
      delayed_off: 500ms
    on_press:
      then:
        - switch.turn_on: "redLED"
        - switch.turn_on: "relay"
    on_release:
      then:
        - switch.turn_off: "redLED"
        - switch.turn_off: "relay"
  - platform: remote_receiver
    internal: false
    name: "Button A2" # button A2 set for toggle
    rc_switch_raw:
      code: "010101010101010101010101"
    filters:
      delayed_off: 500ms
    on_press:
      then:
        - switch.turn_on: "redLED"
        - switch.toggle: "relay"
    on_release:
      then:
        - switch.turn_off: "redLED"
  - platform: remote_receiver
    internal: false
    name: "Button A3" # button A3 only forwarded to hub - no red LED either
    rc_switch_raw:
      code: "001100110011001100110011"
    filters:
      delayed_off: 500ms
Some other notes:
- 500ms for the delayed off filter seemed to be the minimum to properly debounce the input when holding down the RF button.
- Change internal from false to true on each remote_receiver binary sensor to hide each button from the hub.
Split Configuration
If you have multiple of these relays, you may want to keep the shared code in one file and only put device specific information in files for each relay.
ktnnkg-common.yaml:
esphome:
  name: ${device_name}

esp8266:
  board: esp01_1m

wifi:
  ssid: !secret wifi_ssid
  password: !secret wifi_password
  fast_connect: on #we only have one WiFi AP so just use the first one that matches
  ap: #since we listed an SSID above, this AP mode will only enable if no WiFi connection could be made
    ssid: ${friendly_name}_AP
    password: !secret wifi_password

logger:
  baud_rate: 0 #disable UART logging since we aren't connected to GPIO1
  level: DEBUG # esphome default is already DEBUG, but this must be at at least DEBUG for RC codes to be dumped to the log

# Enable Home Assistant API
api:

# Enable OTA updates
ota:
  safe_mode: True

# Enable web server
web_server:
  port: 80

switch:
  - platform: gpio
    name: "${friendly_name}"
    id: "relay"
    pin: GPIO04
  - platform: gpio
    name: "redLED"
    id: "redLED"
    internal: true
    pin:  GPIO13
    inverted: true

status_led:
    pin:
      number: GPIO15
      inverted: true

remote_receiver:
  pin:
    number: GPIO05
    inverted: false
  dump:
    - rc_switch

switch:
# Main relays
  - platform: gpio
    name: "${friendly_name}"
    id: "relay"
    pin: GPIO04
  - platform: gpio
    name: "redLED"
    id: "redLED"
    internal: true
    pin:  GPIO13
    inverted: true

status_led:
    pin:
      number: GPIO15
      inverted: true

remote_receiver:
  pin:
    number: GPIO05
    inverted: false
  dump:
    - rc_switch
And for each device's yaml. Note that the whole binary_sensor section including the on-device button goes here, this cannot be split up.
substitutions:
  device_name: ktnnkg
  friendly_name: KTNNKG

binary_sensor:
  - platform: gpio
    pin:
      number: GPIO12
      inverted: True
    name: "${friendly_name} Button"
    on_press:
      - switch.toggle: "relay"
    internal: true
  - platform: gpio
    pin:
      number: GPIO12
      inverted: True
    name: "${friendly_name} Button"
    on_press:
      - switch.toggle: "relay"
    internal: true
  - platform: remote_receiver
    internal: false
    name: "Button A1"
    rc_switch_raw:
      code: "101010101010101010101010"
    filters:
      delayed_off: 500ms
    on_press:
      then:
        - switch.turn_on: "redLED"
        - switch.toggle: "relay"
    on_release:
      then:
        - switch.turn_off: "redLED"

<<: !include ktnnkg-common.yaml