Contributing: Adding Devices
Create device folder and markdown file
Step 1: Fork the repository
Go to github.com/esphome/devices.esphome.io/fork and click
Create fork. This gives you your own copy of the repo at github.com/<your-username>/devices.esphome.io.
Once your fork is created, come back to this page to continue.
Step 2: Create the device file
The fastest way is to use the link generator below — fill in the link to your fork (or just your GitHub username) and the device name, and it will open GitHub’s new file page with the filename and front matter pre-filled.
Or create the file manually
Follow these steps in your fork:
-
Open the devices folder. Navigate to
src/docs/devicesin your fork. -
Click Add file → Create new file.
-
Name the file. Start by typing your device’s folder name — e.g.
some-new-device:
Then type a
/(forward slash) after the name. GitHub will automatically turn what you typed into a folder and move the cursor into a new filename field inside it. Finish by typingindex.md:
Use hyphens (
-) in folder names instead of underscores or spaces. This keeps the generated URLs clean and readable.
Step 3: Write the content
The file needs a YAML front matter block at the top, followed by the device’s documentation in Markdown.
If you used the link generator in Step 2, the filename and a starter template are already filled in for you — but you
still need to fill in the empty front matter fields (type, standard, and optionally board) and write the
documentation in the body.
If you created the file manually, you’ll need to add the entire front matter block plus the documentation yourself.
See the YAML front matter section below for the list of valid options for each field.
Step 4: Commit your changes
Click Commit changes… at the top right. A dialog will appear:
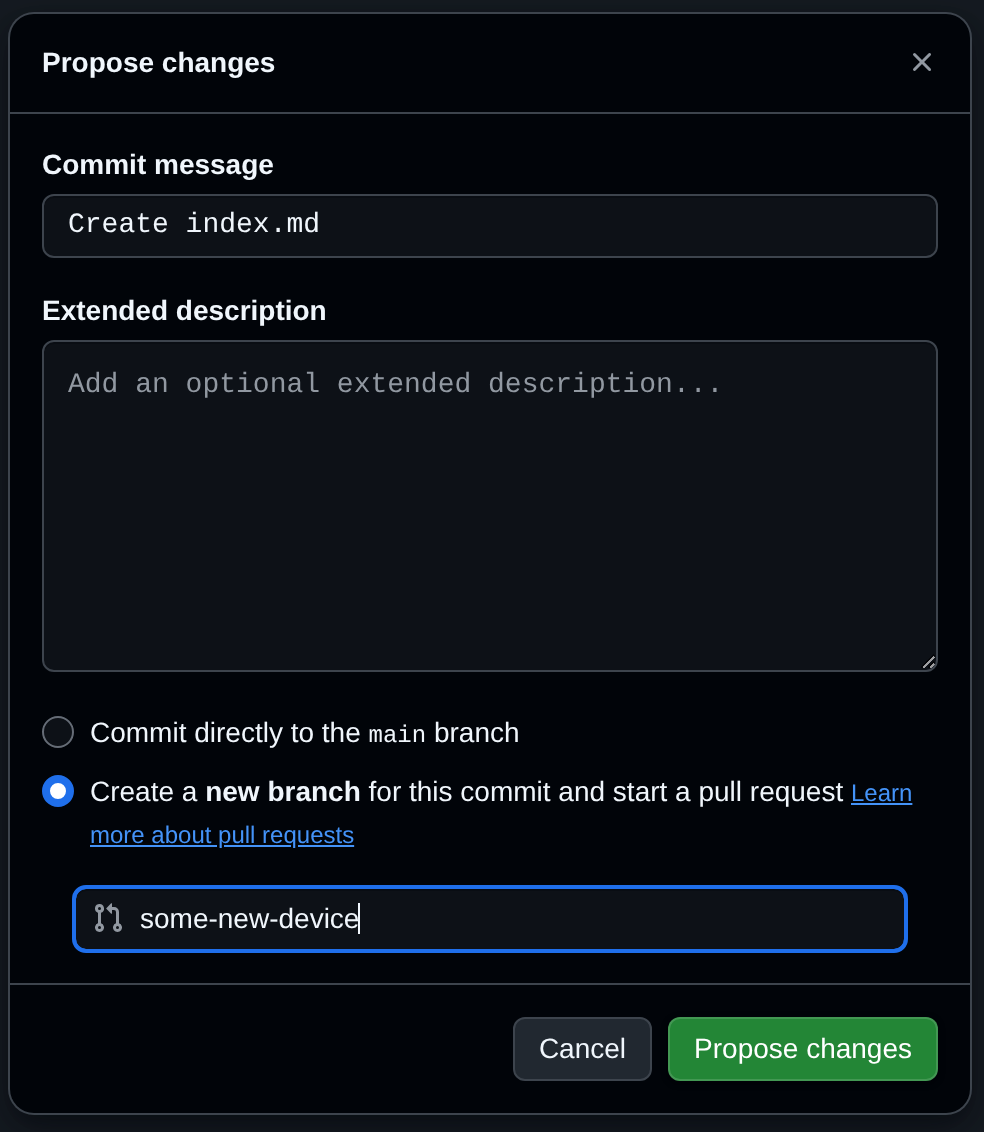
- Leave the default commit message or write your own.
- Important: select Create a new branch for this commit and start a pull request, and give the branch a short
name like
some-new-device. Do not commit directly tomain— committing tomainin your fork makes it harder to open clean pull requests later. - Click Propose changes.
Step 5: Open the pull request
GitHub will take you to the pull request page automatically. Check that the base repository is
esphome/devices.esphome.io and the base branch is main, then click Create pull request to submit it.
If the base repository is set to your own fork instead of esphome/devices.esphome.io, click the
compare across forks link near the top of the page. That will reveal the base repository dropdown — switch it
to esphome/devices.esphome.io and make sure the base branch is main before clicking Create pull request.
YAML Front Matter
Each .md file created needs to contain front matter in order for the page to be generated. Details of the front matter
required (and optional) is detailed below:
---title: Sonoff S20date-published: 2019-10-11type: plugstandard: uk, us---| Field | Description | Allowable Options | Required? |
|---|---|---|---|
title | Device Title | Yes | |
date-published | Date Published | Formatting: YYYY-MM-DD HH:MM:SS +/-TTTT (Time and Timezone offset are optional) | Yes |
type | Type of Device | dimmer, light, misc, plug, relay, sensor, switch | Yes |
standard | Electrical standard country | au, br, eu, global, in, uk, us | Yes |
board | Type of board used in product | bk72xx, esp32, esp8266, ln882x, rp2040, rtl87xx | No (but required to show on Boards page) |
project-url | URL for product or GitHub. Points to working Yaml file or page where yaml file is easily accessible | No | |
made-for-esphome | Has the manufacturer certified the device for ESPHome | True, False | No |
difficulty | Difficulty rating | 1: Comes with ESPHome, 2: Plug-n-flash, 3: Disassembly required, 4: Soldering required, 5: Chip needs replacement | No |
Configuration YAML files
Each example configuration on a device page lives in its own .yaml file alongside index.md and is included
into the page via a fenced code block of the form:
```yaml file=config.yaml```The build pipeline replaces the empty fence with the file’s contents at render time, so the rendered page still
shows a normal yaml code block. Linking from a .yaml URL elsewhere (e.g. a download link) also continues to work
because .yaml files are mirrored into the published site.
The following rules are enforced by npm run validate-devices:
| Scope | Rule |
|---|---|
| Every yaml file | Must parse as valid YAML. |
| Every yaml file | No passwords (literal or !secret) on any password:, *_password:, or psk: key. |
| Every yaml file | No !secret references anywhere. Example configs must not depend on the user’s secrets.yaml. |
First file= fence on a page | Must reference config.yaml. url= fences may appear before or after — only file= fences count toward this ordering rule. |
config.yaml only | No top-level api:, ota:, mqtt:, web_server:, improv_serial:, bluetooth_proxy:, etc. |
config.yaml only | wifi: is allowed for radio/hardware tunables (country, power_save_mode, output_power, …). It must not contain ssid, password, networks, manual_ip, eap, or use_address. An empty ap: block is allowed (and recommended) so the device boots into a default fallback hotspot. |
config.yaml only | No platform: homeassistant, platform: mqtt, or platform: template anywhere — those are network-dependent or user-derived, not hardware. |
made-for-esphome: true pages added/modified by the PR | Must include at least one url= yaml fence pointing at a .yaml/.yml file in the manufacturer’s GitHub repo (github.com/<owner>/<repo>/(blob|raw)/<ref>/... or raw.githubusercontent.com/<owner>/<repo>/<ref>/...) — see Live yaml from a GitHub URL below. |
Additional yaml files (e.g. voice-assistant.yaml, battery-percentage.yaml) can hold derived sensors,
automations, or anything else specific to one feature — they just have to be valid YAML and follow the
no-passwords / no-!secret rules.
If you have inline yaml in an existing markdown page, extract it to files with npm run extract-yaml -- <path>.
The script is idempotent — it leaves already-migrated fences alone and writes the first fence on each page as
config.yaml. Quotes around the file attribute are optional (file=config.yaml and file="config.yaml" both
parse).
Small snippets that stay inline (inline marker)
The file= rule exists so full example configs live in their own files. For a very small illustrative snippet —
a couple of lines showing one option, not a runnable config — extracting it to a file is overkill. Mark the fence
inline and it stays on the page verbatim; the validator and npm run extract-yaml both leave it alone.
```yaml inlinesensor: - platform: adc pin: GPIO34```Use this only for short snippets. Anything that is (or grows into) a real, runnable config belongs in its own
.yaml file via file= — inline is not an escape hatch for skipping the no-passwords / no-!secret rules on a
full config.
Live yaml from a GitHub URL (url= form)
For made-for-ESPHome devices whose configuration lives in the manufacturer’s own GitHub repository, you can point
at the upstream yaml directly instead of vendoring a copy. url= is allowed on any device page, but it isn’t the
standard form outside of made-for-ESPHome — for ordinary devices, prefer file=config.yaml and only fall back to
url= for upstream-pinned references. When a page mixes both, the first file= fence must still be
config.yaml; url= fences can appear anywhere on the page.
```yaml url=https://github.com/esphome/firmware/blob/main/esp-web-tools/esp32.yaml```That fence renders live on this page as:
The current firmware configuration is fetched live from the upstream repository:
# Loading https://github.com/esphome/firmware/blob/main/esp-web-tools/esp32.yaml…The build emits a <remote-yaml-include> element that fetches the file from raw.githubusercontent.com at visit
time and renders it inside the same Expressive Code container as a file= block. An explanatory paragraph
(“The current firmware configuration is fetched live from the upstream repository:”) is auto-injected above each
url= block — pages don’t need to write that sentence themselves.
The host is allowlisted at build time: only https://github.com/... and https://raw.githubusercontent.com/...
URLs are accepted. Any other host (or non-https:// URL) triggers a build warning and the block is dropped.
To satisfy the made-for-esphome rule, the URL must also point at an actual yaml file the renderer can fetch as raw bytes:
https://github.com/<owner>/<repo>/(blob|raw)/<ref>/<path>.yamlhttps://raw.githubusercontent.com/<owner>/<repo>/<ref>/<path>.yaml
(.yml works too; refs/heads/<branch> and refs/tags/<tag> are both accepted in the ref slot.) A bare repo
URL, a tree/directory URL, or a non-yaml file all render as HTML or 404 in the browser, so they don’t count.
url= blocks are not validated by npm run validate-yaml. Validation only inspects the yaml referenced via
file= because we can only check what’s in the repo — the upstream file’s contents are out of our control. If you
want the same compile-time guarantees, vendor a snapshot into the repo as config.yaml (file= form) instead, or
pin the URL to a specific commit SHA so the rendered page can’t drift after the device ships.
Pages that opt into Made for ESPHome by setting
made-for-esphome: true in frontmatter must include at least one url= fence pointing at a host on the
allowlist. The programme requires the firmware config to be open and reachable; a live link to the upstream yaml
is how we surface that on the device page. npm run validate-yaml enforces this on every PR that adds or modifies
a made-for-esphome page.
Images
To add images to your files do the following:
- Add the images to your newly created device folder in
/src/docs/devices - Add the images to your folder using the appropriate markdown syntax:
